Salesforce Integration
This guide will walk you through integrating Bandwidth Messaging with Salesforce. This integration will allow you to send messages from your Salesforce instance using Bandwidth's Messaging API.
For this guide - we are integrating with Salesforce Lightning using the Flow Designer. If you are using Salesforce Classic, the steps may differ.
Prerequisites
Before you can integrate Bandwidth Messaging with Salesforce, you will need to ensure the following:
- You have a Bandwidth account enabled for programmable messaging. If you are unsure, please reach out to your account manager or Bandwidth Support.
- You have created API credentials for use with the Bandwidth APIs. Please refer to the credentials documentation for more information.
- You have provisioned your account with a Sub-Account (Site), Location (Sip-Peer), and Messaging Application. If you are unfamiliar/unsure, please refer to the following documentation:
- You have purchased a phone number for use with Bandwidth Messaging. If you have not, please refer to the phone number purchasing documentation for more information.
- You have associated your number with a Campaign. For more information on Campaigns, please refer to the Campaigns documentation.
Integration Steps
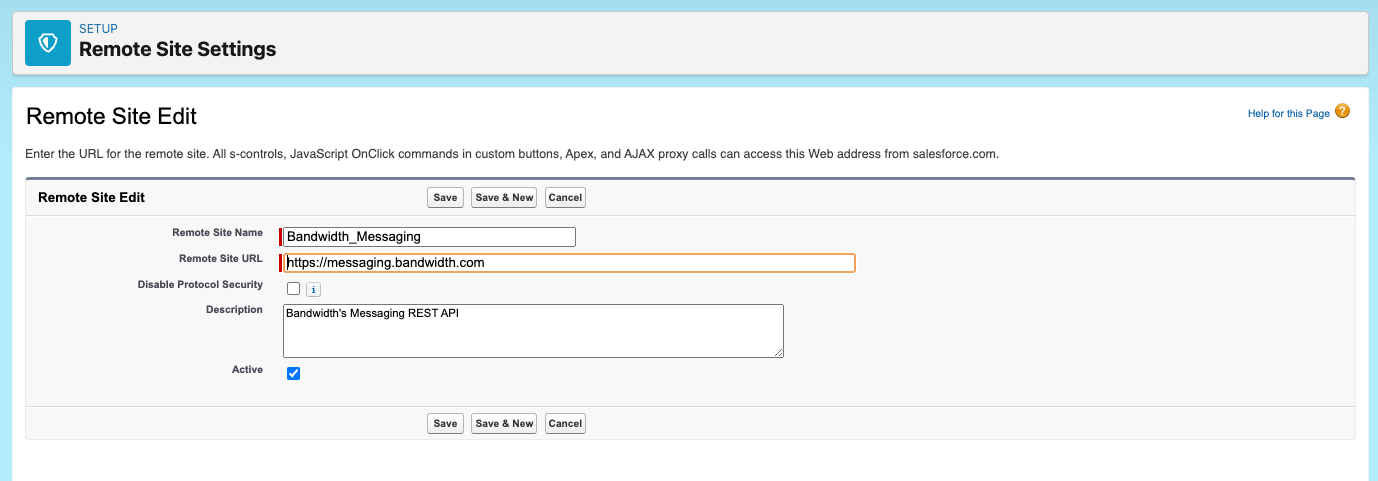
Add a Remote Site
Start by adding a new remote site setting in Salesforce. This will allow Salesforce to make requests to the Bandwidth API. This can be found under Setup > Security > Remote Site Settings.
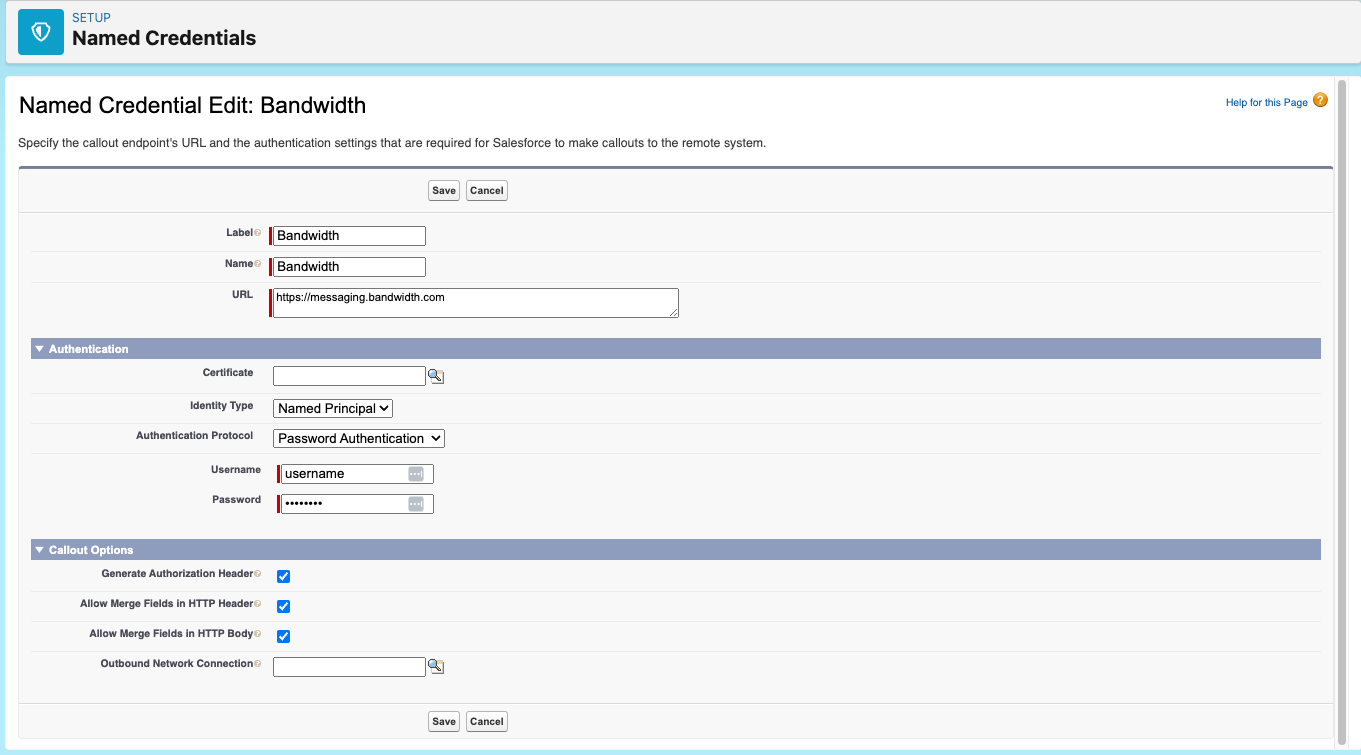
Create an External Credential
Next, we need to create an external credential to store our Bandwidth API credentials. This can be found under Setup > Security > Named Credentials.
Click the dropdown next to New and create a New Legacy credential. Enter the following information:
- Label: Bandwidth
- Name: Bandwidth
- URL:
https://messaging.bandwidth.com - Identity Type: Named Principal
- Authentication Protocol: Password Authentication
- Username: Your Bandwidth API Username
- Password: Your Bandwidth API Password
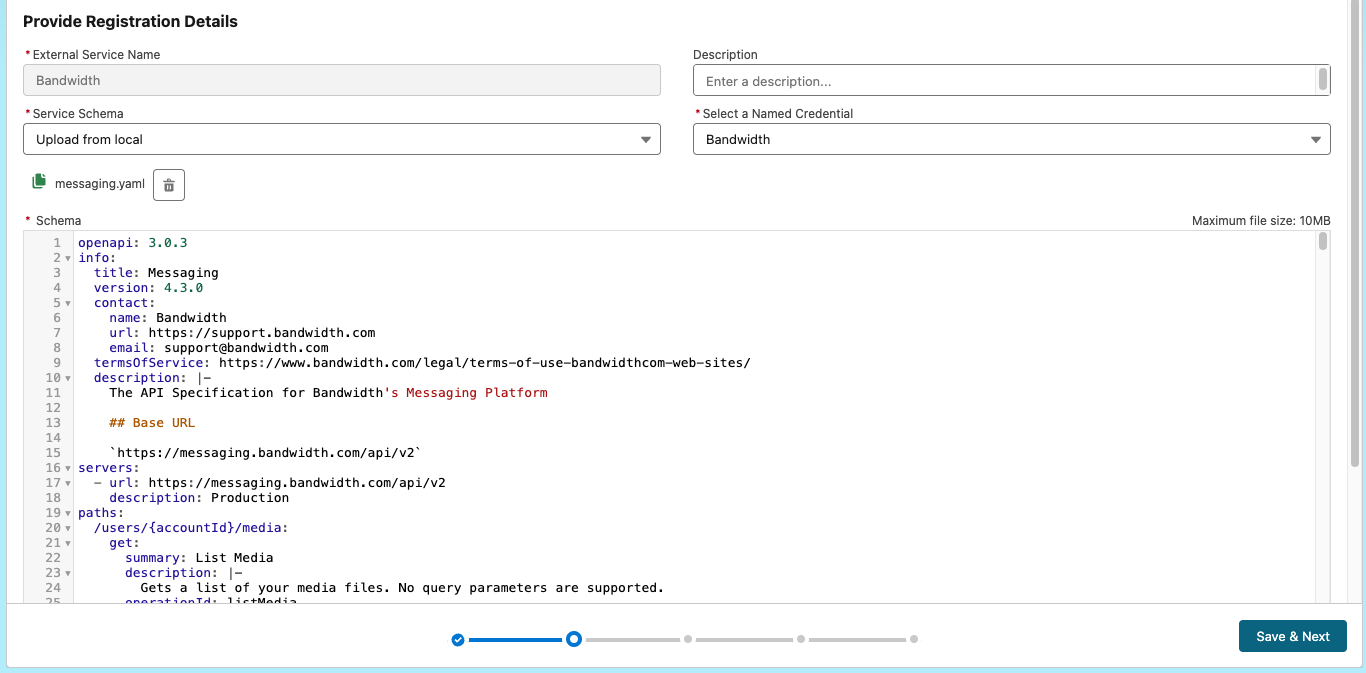
Add an External Service
Next, we need to create an external service to define the Bandwidth API. This can be found under Setup > Integrations > External Services. Click New External Service to begin.
Select From API Specification and continue.
Enter the following information:
- External Service Name: BWMessaging
- Description: Bandwidth Messaging API
- Service Schema: Upload from Local
- Select a Named Credential: Bandwidth
Now, we need to download the API schema from Bandwidth. You can find the schema here. Click Download and download the file.
The file is downloaded as bandwidth.yml - you will need to rename this to bandwidth.yaml before uploading. Salesforce only accepts the .yaml extension.
After the file is renamed, you can upload it.
The Bandwidth Messaging API supports group messaging by defining the to field in the message request body as a list of E164 Phone Numbers.
The salesforce Apex class created by uploading the API spec does not seem to support a json property of type List<String>. We need to manually change the API spec to define to as a single string.
There are two instances of to that need to be changed in the bandwidth.yaml file.
In #compomnents/schemas:
- there is a
messageclass (currently on line 639) containing atoobject (currently on line 668) that needs to be changed. - there is a
messageRequestclass (currently on line 707) containing atoobject (currently on line 719) that needs to be changed.
from:
to:
    uniqueItems: true
    type: array
    items:
        type: string
    description: The phone number recipients of the message.
    example:
        - '+15552223333'
to:
to:
    type: string
    description: The phone number recipient of the message.
    example: '+15552223333'
Once the spec definition is uploaded and those classes are updated - you can click Save & Next. If any warnings are displayed, you can ignore them.

You may receive a warning about unsupported media types - if you are asked to select a response Supported Media Type, you can select application/json. Then click Next.
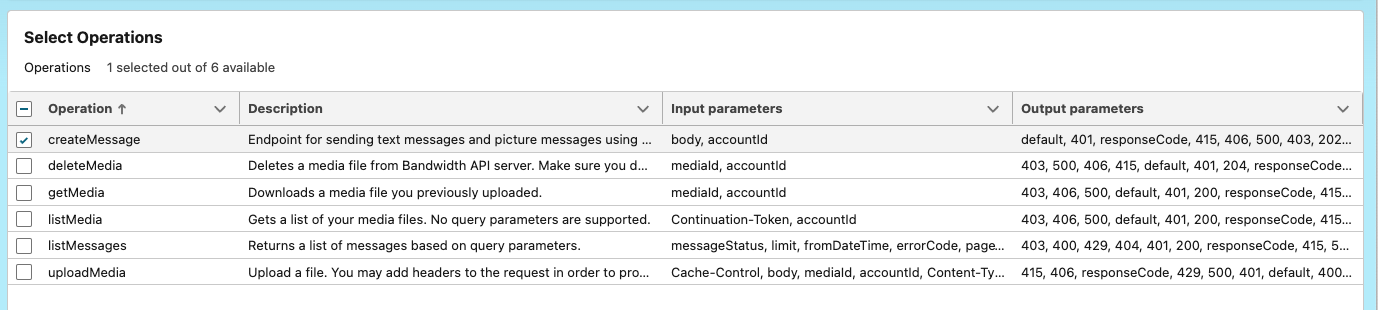
Now we can select the operations we want to expose from the integration. For the purpose of this guide, we will only be using the createMessage operation. Click Next.
Finally, we can review the external service and click Finish. Now we are ready to create a flow.
Create a Flow
To create a flow - we need a use-case. For this guide, we will create a flow that sends a message when a Contract Agreement is signed.
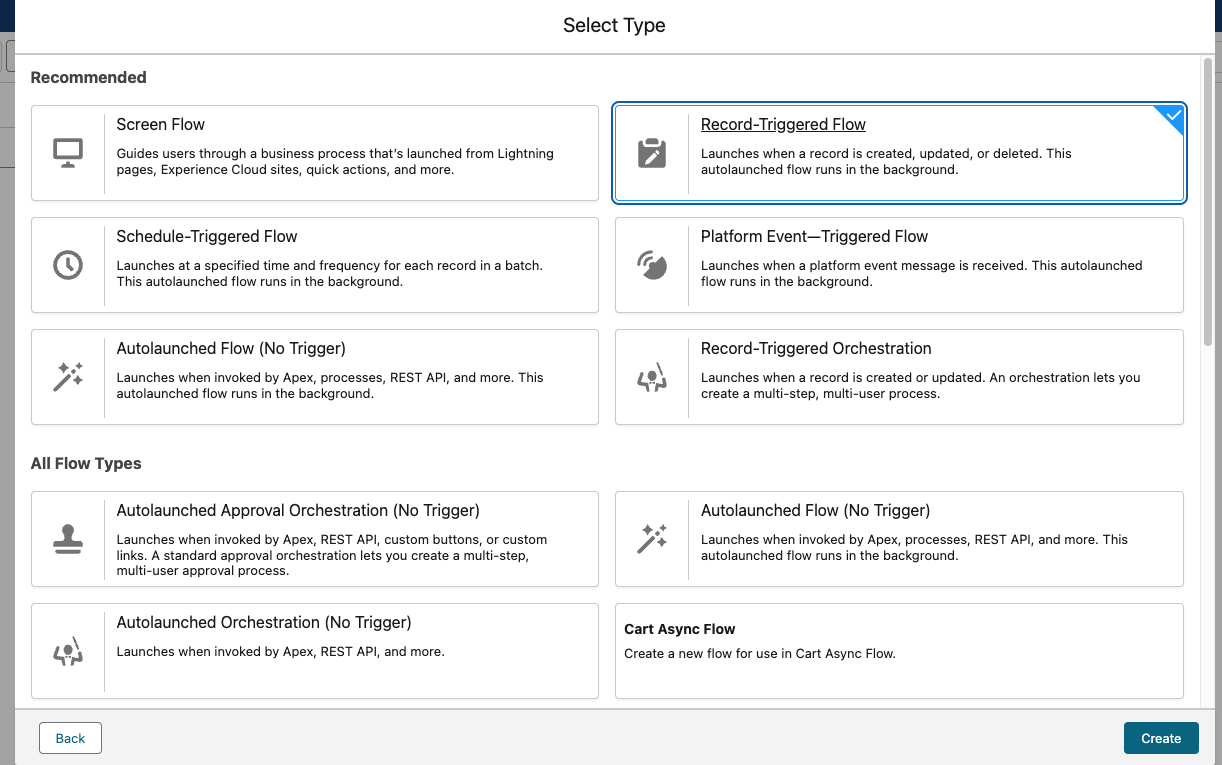
Navigate to the Flow Designer and create a new flow. We will select Start From Scratch and create a Record-Trigged Flow. However, the Bandwidth API can be used in any flow type.
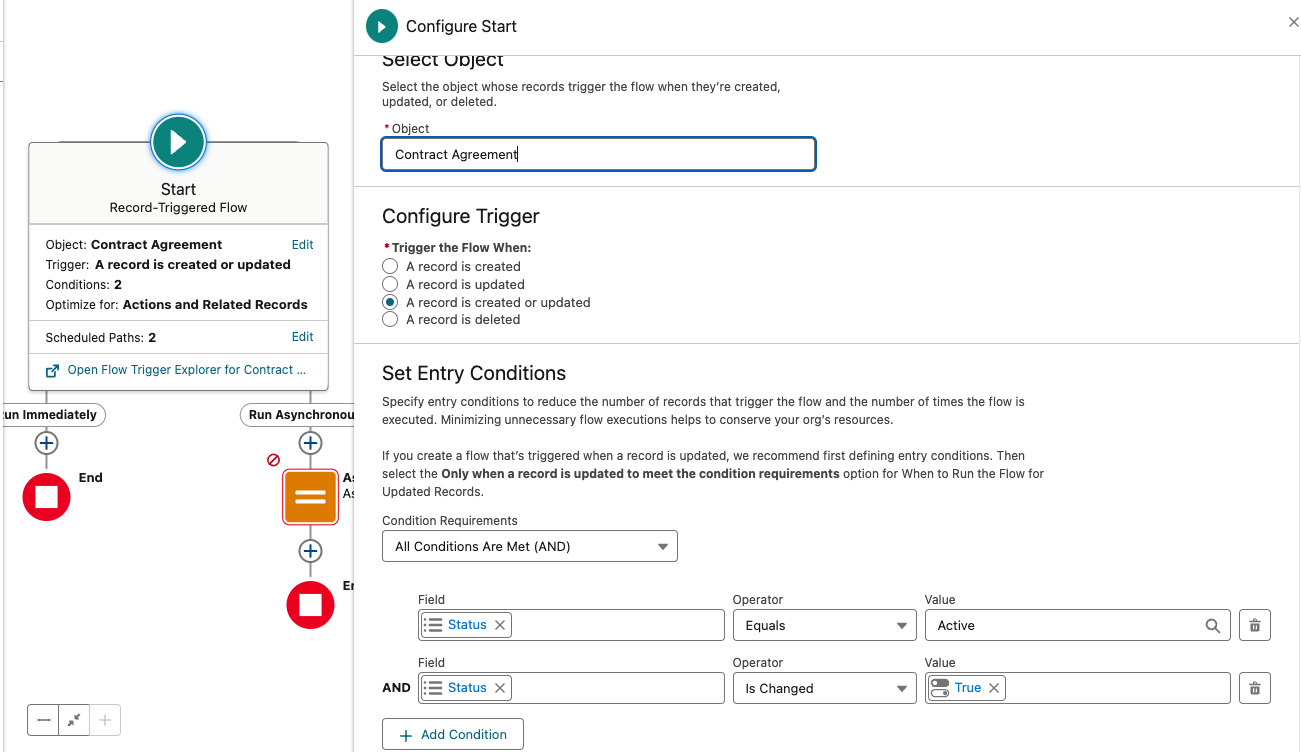
We need to configure the flow to trigger when a Contract Agreement is signed. You can configure the flow to trigger on any object and event you desire. For this guide, we will use the Contract Agreement object.
For the Trigger, we will select When a Record is Created or Edited. To ensure our flow is only run when a Contract Agreement is signed, we will add a condition to check if the Status field is Active and that Status Is Changed equals True - so that the flow is only run when the status is changed to active.
We also want to include a Run Asynchronously option to ensure the flow runs in the background. This is required by Salesforce - external service actions cannot be run synchronously.
Add Constants
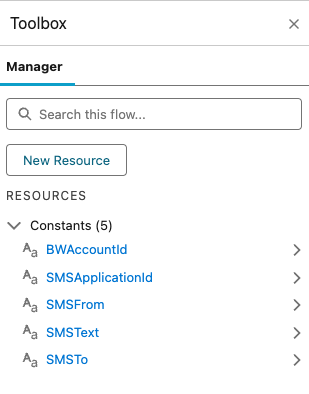
Next, we need to add some constants to the flow. We will need the following:
- Bandwidth Account ID: Your Bandwidth Account ID
- From Phone Number: Your Bandwidth Phone Number
- Bandwidth Application ID: Your Bandwidth Application ID
- Message Text: The message you want to send
- To Phone Number: The phone number you want to send the message to
All of these constants can be set to Text - but note that you can use variables that pull from related salesforce records or other sources.
Add a Variable
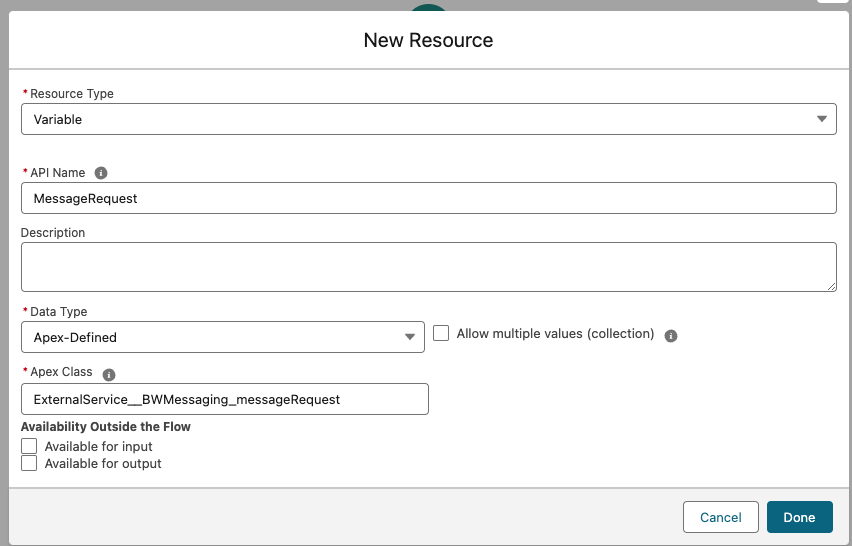
We need to add a variable to represent the message request body. This will be a JSON object that represents the message we want to send. We need the following:
- Create Message Reqeust: The request body for the Bandwidth API - This is an Apex Class created by Salesforce when you uploaded the API spec.
Enter the following field values:
- Resource Type:
Variable - API Name:
MessageReqeust - Data Type:
Apex Defined - Apex Class:
ExternalService__BWMessaging_messageRequest
Add Steps
We need to add 2 steps to our flow, and Assignment step and an Action step.
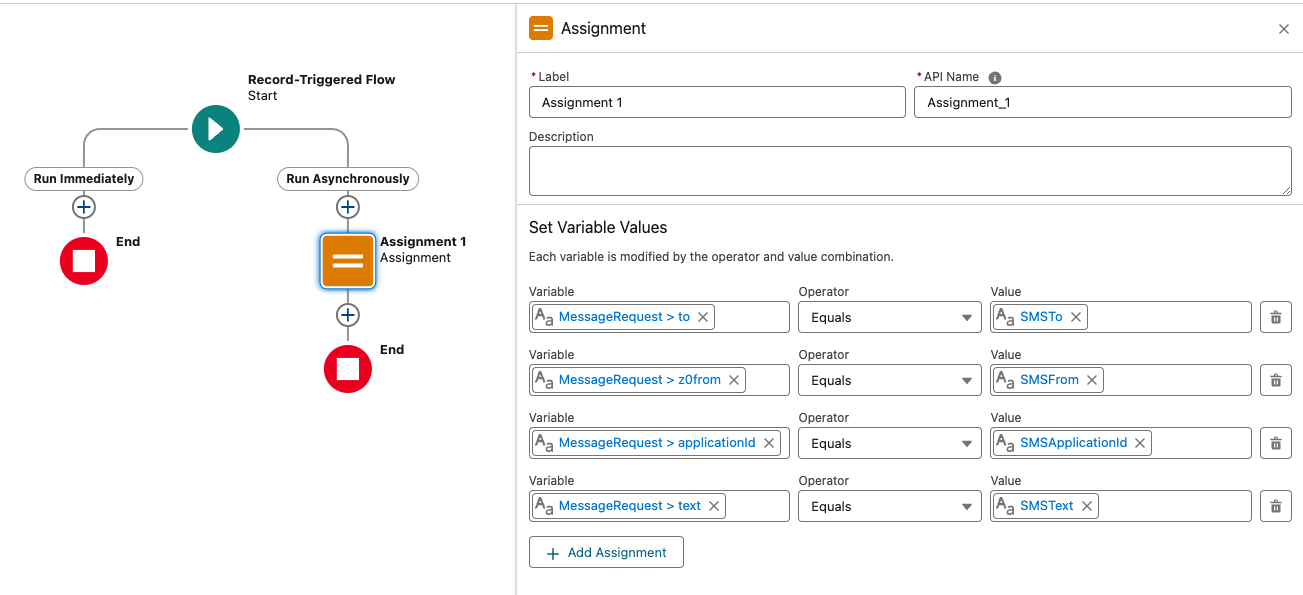
Create the Assignment step and assign the constants we created earlier to the MessageRequest variable we defined.
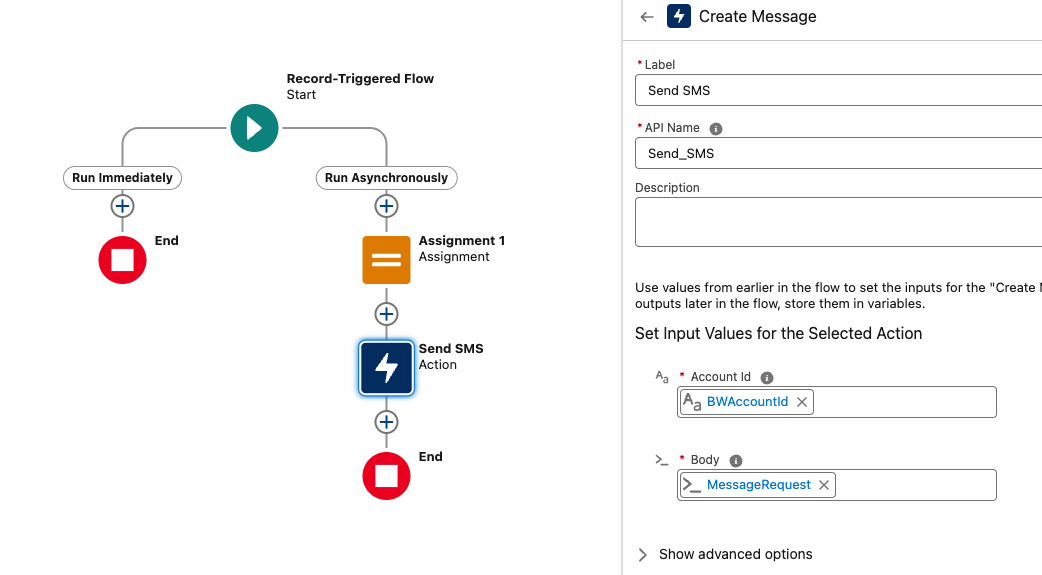
Create the Action step and select the Create Message operation from externalService-BWMessaging.createMessage. Provide a label for the action and set the input values.
For Account Id we will use the BWAccountId constant we created earlier. For the MessageRequest we will use the MessageRequest variable we created earlier and assigned values to in the previous step.
Debug
You can now debug the flow to ensure it is working as expected. You can do this by saving and clicking Debug in the top menu bar.
Use the following Debug Options:
- Path for Debug Run:
Run Asynchronously - Run the Flow As If the Record Is:
Updated
Ensure you select a triggering record and update the triggering record appropriately. For our Contract example, select a Contract Agreement and change the status to Active.
Save and Activate
Once you have completed the flow, be sure to save and activate it. You can now test the flow by creating a new Contract Agreement and changing the status to Active.